

It is my fervent hope that I will be able to finish finishing this "Stormwatch" resin (sculpted by the excellent Sarah Minkiewicz-Breunig, of course) within the next couple of weeks! I've been giving sneak peeks of his progress on my Facebook business page lately, so I thought I'd share the love here too. This big guy, who I'm calling "NW Stormy Weather," has given me quite the lesson-filled journey as we go along together. I will say he's been the most challenging (and hopefully will be the most impressive) resin I've painted thus far. But challenging in a good way, thankfully- I can truly say that for the most part, I've enjoyed working on him. Resinland is not my natural habitat- that would be Ceramicsville. I find stepping out of my comfort zone every now and again is good for me as an artist- it makes me grow and sometimes leads me to think up new ways to approach ceramic finishing techniques. Of course, sometimes it leads to near-cursing and tearing-of-the-hair, but Praise Be, that largely has not been the case, this go-around!
So, what are some of the lessons I've learned with this Stormy?
Well, as I expected I still hate resin prep. But that is over and done with long ago, so I won't dwell there. Also, airbrushed ceramic underglaze can work really well for dappling provided a) You have a good (unsealed) acrylic basecoat, b) You can dapple and erase several layers, but once you seal it, that's it. Don't airbrush underglaze over that and expect to dapple more* and c) Seal your final layer well** (I used Krylon Matte on Stormy- it seemed to do the trick!).

Another lesson? Variegated manes & tails are hard. I still can't believe how many hours I've put into Stormy Weather's hair, and I'm still not completely happy. Hopefully, I'll get there soon. Below is a chart showing a few different stages it went through. It is hard to tell on stage A, but the white of the mane was just too white. It did not quite match the body of the horse! So now it matches much better (Stage B), and it is blended a little more. I know I'm still going to mess with it... I'm curious, what do y'all like more, larger areas of white hairs as in B, or more individual strands showing, as in A?

Details take a long time too, but they're the most fun bits. Things like hoof-stripes, ermine spots, mapping, etc- I love doing them in ceramic, but with resin it is even a more fun challenge, because you can really push the medium!
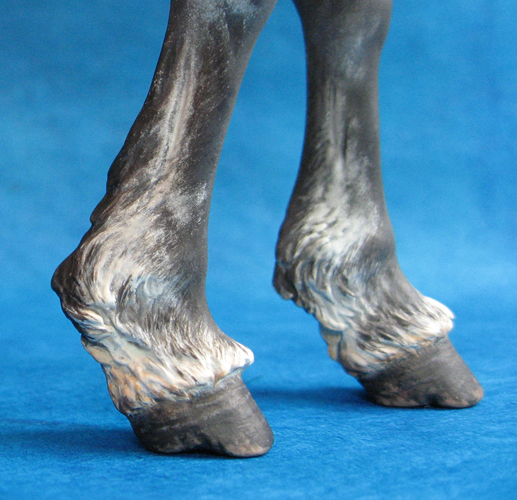
I've got the dark front hooves pretty well set- the back, shell hooves, I may tweak a bit more (too much variety in my reference photos! I have such a hard time picking out just 'the look' I want!).

Muddy, muddy, muddy!
And my last lessons (so far)? Mixing big batches of colors you like & storing them in bottles is a very good idea, stop and take your dog on a walk if an area just isn't working for you, there are countless hours of interesting talks on the Catholic Answers radio archives (and Pandora is my friend, too!), and I have a very, very patient husband who so far, doesn't seem to mind that I took over the dining room table***, because my ceramic workstation has, well, ceramic stuff on it.
That's about all I can think of, right now! Hopefully my next post here will be about the completed "NW Stormy Weather." I still plan on auctioning him when he is done, and photographed. I think I'd better wait until the tax deadline has passed (we've been doing plenty of tax-prep here of late, too!). Until then, I hope your weather is getting sunnier, not stormy (like it is here in the NW!). :)
*Okay- this I learned the hard way with another horse, but I mention it here because I was reminded of it while working on Stormy.
** I did rub him in a couple of small areas where I didn't seal him well. Lesson learned!
*** In all fairness, my studio is located in our small house's dining "area." The table was too close and was just asking to be used.